
Here’s the component about Hairstyles For Girls With Long Hair – it makes you appear to be a goddess the way the no different length of hair can. Not to neglect that, at least as soon as a day, you acquire this self confidence-boosting compliment – “OMG! Your hair is soooo pretty!” Be that as it could, there may be a disadvantage to having luscious lengthy hair. Doing any type of hairstyle on long hair appears to take a while and makes you want to take a scissor and get rid of it. Now, lovable ladies, I would by no means want you to present into that frustration. So, here I have compiled my top favorite alternatives of lovely Hairstyles for Kurti with long hair so you can do without difficulty without ending up in tears!
20 Awesome Hairstyles For Girls With Long Hair
1. Twisted Bun
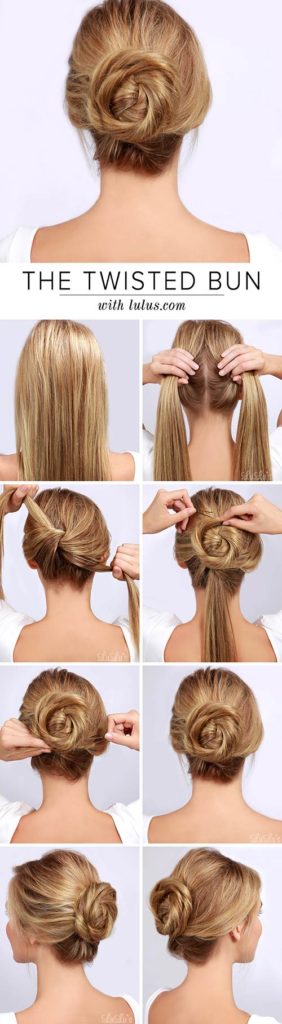
See, I don’t assume you to drop a quite dime to get your hair done whenever you have got a faculty dance or wedding to attend. Instead, you can do this quite twisted updo yourself in much less than 10 minutes. This bun seems deceptively problematic; however, it is undoubtedly excellent simple to achieve.
What You Need
- Hairbrush
- Bobby pins
- U pins
- Hairspray
How To Style
- Brush out all the knots and tangles from your hair.
- Part your hair down the middle.
- Continue parting your hair until the nape of your neck so that your hair is divided vertically into two sections.
- Holding every phase in every one of your hands, tie them right into a single shoelace knot in the back of your head.
- Take the tail of the phase of hair putting on your proper and twist it right until the cease.
- Roll this twisted section right into a circular bun around the knot and secure it to your head with bobby pins and U pins.
- Repeat steps five and six together with your left phase of hair, making sure you roll it right into a bun inside the opposite direction of the primary period.
- Spritz on some hairspray to set the updo in the vicinity.
Also See :- 10 Simple Indian Hairstyles for Kurti 2020
2. Extra Long Double Ponytail
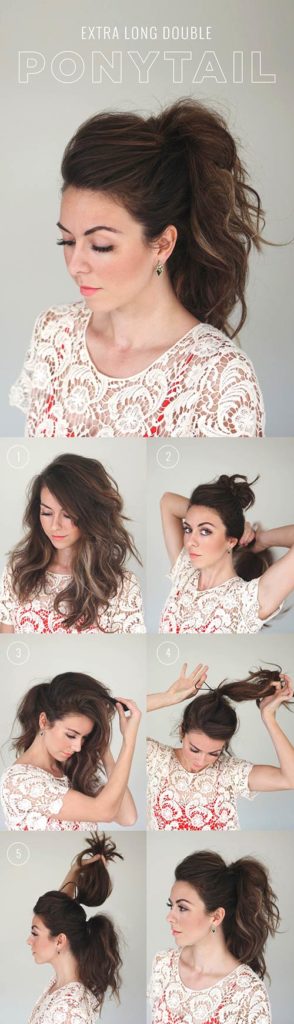
You may additionally have exquisite lengthy hair; however, it may no longer look as complete and long as you want it to when you tie it up in an excessive ponytail. That’s due to the fact you’re going about tying it all wrong. This simple hack of a style makes use of ponytails tied on a pinnacle of each other to offer your ponytail fuller body, period, and dimension.
What You Need
- Texturizing spray
- Comb
- Hair elastics
How To Style
- Spritz on some texturizing spray throughout your washed, dried hair.
- Horizontally divide your hair into two sections.
- Tie the top segment of hair in a severe bun to section it away.
- Tie the decrease section of hair right into a mid-degree ponytail behind your head.
- Untie the top phase of hair.
- Backcomb the hair at the crown of your head to provide it with some quantity.
- Tie the pinnacle section of hair into a ponytail proper above the bottom ponytail.
- Fan out the top ponytail to conceal the bottom of the bottom ponytail and finish off the look.
3. Braided Flower Crown
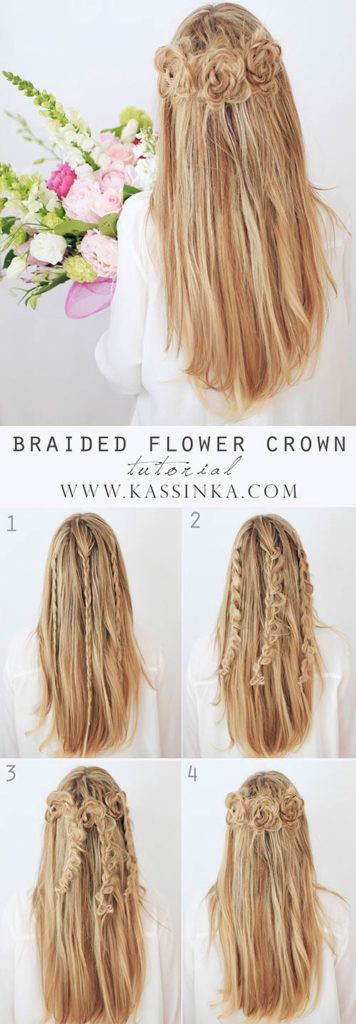
When it comes to feminine hairstyles, this one is as girly as it gets. I mean, who wouldn’t love to have their hair appear like roses, proper? Again, this is a hairstyle that looks like it’d take a long time to ideal but sincerely just requires a few basic braiding and pinning.
What You Need
- Hairbrush
- Hair elastics
- Bobby pins
- Light maintain hairspray
How To Style
- Brush all the knots out of your hair, then brush it all lower back.
- Pick up a 3-inch phase of hair from the crown of your head, braid it properly till the give up and steady it with a hair elastic.
- Repeat the preceding step on more significant sections of hair picked up from either facet of the primary phase.
- Loosen all three braids by way of tugging them free from the right.
- Start circularly rolling every braid (making sure the loosened aspect remains at the outdoor) and hold pinning it down flat towards your head along the way to make it look like a flower.
- Finish off with a few spritzes of light preserve hairspray to set the braided plants in the area.
4. Khaleesi Inspired Twist
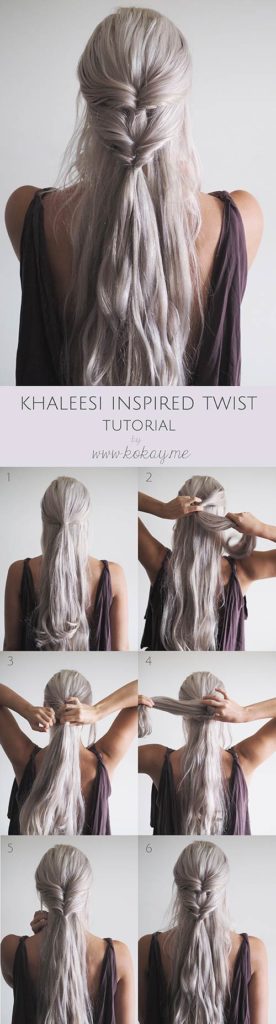
Embrace your inner queen (or, might I say, your internal Khaleesi) with this Game Of Thrones stimulated hair look. This topsy tailed style is a simplified model of the intricate hair appearance sported by using Daenerys Targaryen and appears perfect on lengthy flowy maxi skirts and sundresses.
What You Need
- Hairbrush
- Hair elastics
- Sea salt spray
How To Style
- Start via brushing all of your hair again.
- Leaving out some sections within the front to frame your face, seize the pinnacle half of your hair and tie it in a ponytail.
- With your fingers, create a gap within the hair proper above the hair elastic securing your ponytail.
- Flip your ponytail up and into this gap to topsy tail it.
- Grab two sections of hair from near both your ears and tie them right into a ponytail right above the first ponytail.
- Topsy tail this ponytail twice.
- Spritz on sea salt spray to offer your hair a few textures and end off the look.
5. Half Dutch Ponytail
Add some pizzazz on your fundamental ponytail look by using incorporating some dainty braiding into it. A facet Dutch braid works fantastically to make your hair appear voluminous and to reveal off your kickass braiding skills! Use it to enhance the beauty of your easy ponytail.
What You Need
- Hairbrush
- Texturizing spray
- Hair elastics
- Bobby pins
How To Style
- Brush returned all of your hair.
- Spritz on some texturizing spray throughout your hair to provide it with a few hold.
- Pick up a piece of hair from above one ear (whichever ear you prefer) and divide it into three sections.
- Dutch braid those three sections by way of flipping the side segment under the middle section and adding new hair into the braid (handiest from the facet of your ear) with each stitch of the braid.
- Once your Dutch braid has reached the again of your head, genuinely braid it properly till the cease and steady it with a hair elastic.
- Tie all your hair (inclusive of the Dutch braid) into a ponytail.
- Pick a thin segment of hair, wrap it around the base of your ponytail to hide the hair elastic from view, and stable it with a bobby pin.
Also See :- 20 Most Flattering Hairstyles For Round Faces
6. Half Up Bow
Whoever instructed you that bows handiest belong on Christmas and birthday gives turned into gravely mistaken. A bow constituted of your hair (instead of just attaching a material bow to your nose) is sure to make you appear to be a Disney princess. Add this sweet element in your hairstyle to prepare for a harmless and cute appearance.
What You Need
- Texturizing spray
- Hair elastic
- Sectioning clip
- Bobby pins
- Hairspray
How To Style
- Prep you’re washed, dried hair with a few texturizing spray to provide it with a few maintain.
- Part your hair down the middle.
- Pick up two large sections of hair from either facet of your head and begin tying them into a ponytail.
- At the remaining twist of your hair elastic, don’t pull your hair all of the ways via. This will depart your hair in a loop.
- Split this loop of hair into two.
- Lay the second one loop flat towards your head and stable it down from the bottom with a bobby pin.
- Repeat the preceding step on the alternative loop.
- Flip the tail of your ponytail up and over the middle of the bow and pin it for your head to steady it in area.
- Spritz on a few hairsprays to set the bow in the region.
7. Easy Boho Braid
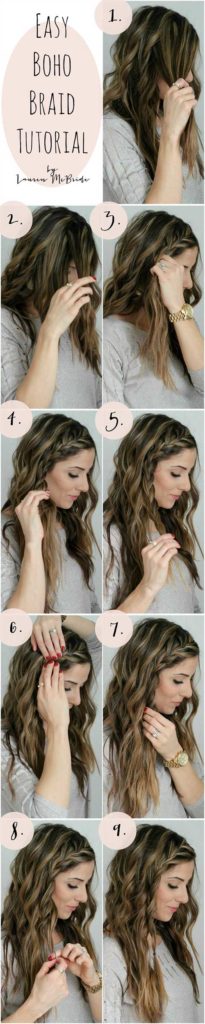
Boho styles had been a rage for years now, and why wouldn’t they be? Their floaty, carefree, and romantic vibes make one look like someone who has stepped out of a dream. If that’s the effect you need to create together with your watch, you want to strive out this boho braided style.
What You Need
- Sea salt spray
- Hair elastic
How To Style
- Spritz on a few sea salt spray throughout your hair and part it on one side.
- From the side with more hair, select up a three-inch segment of hair from right next on your parting.
- Split this phase of hair into three sections.
- Start French braiding these sections using including new hair from the outside into the braid with every stitch of braiding.
- Once your French braid has gone beyond your ear, truly braid right until the quit and stable with a hair elastic.
- Tug apart and loosen your braid to make it look softer and end off the appearance.
8. Asymmetrical Fishtail
Here’s the best thing approximately braiding – just when you assume you’ve seen all of it. All people is doing the identical element; you come back up with a unique twist that nobody has ever seen earlier than. This asymmetrical fishtail accessory creates an unconventional and offbeat appearance to have human beings wondering “Why didn’t I think of that earlier than?”
What You Need
- Heat protectant
- 2-inch curling iron
- Hair elastics
How To Style
- Begin by using applying warmness protectant and curling the lower 1/2 of all your hair.
- Part your hair slightly off the middle.
- Pick up a three-inch section of hair from above one ear, area it alongside the again of your head and convey it to the opposite facet.
- Pick up another 3-inch segment of hair from above the other ear and tie it collectively with the primary section with a hair elastic.
- Split this little ponytail into two parts.
- Fishtail braid these sections by alternately picking up some strands of hair from the outer side of one chapter and including it to the internal aspect of the alternative part.
- Once you have fishtail braided right until the give up, stable it with a hair elastic.
- Loosen the braid to give it some dimension and cut off the hair flexible on the top of your braid to complete off the appearance.
9. Ideal Rope Braid
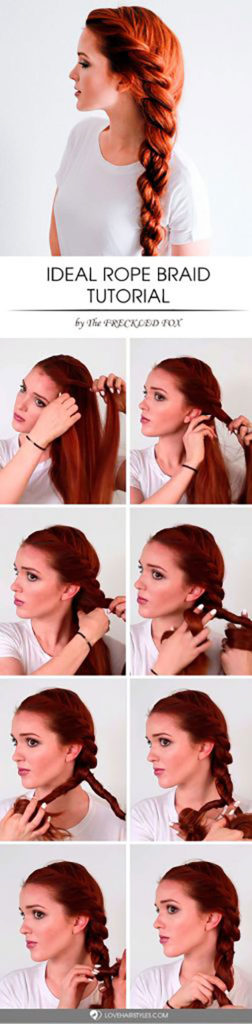
The rope braid is the trendy hairstyles for women with lengthy hair. You should think what’s so “ideal” about this rope braid. Well, it’s ideal as it does now not require any real braiding. All you want to observe is an easy twisting pattern, and the lovely braid you will turn out to be with will communicate for itself.
What You Need
- Texturizing spray
- Hair elastic
How To Style
- Start through spritzing texturizing spray throughout your hair.
- Part your hair on one aspect.
- From the side with more hair, pick up a medium-sized phase of hair from near your parting.
- Split this phase into two.
- Individually twist those sections closer to your face proper until the give up.
- Now intertwine these sections with every other way out of your face, including more into the twists from the facet of your forehead.
- Once your twisted braid has reached the nape of your neck, upload in all of the hair from the returned and cut up your hair equally into two sections.
- Individually twist these sections in the direction of your face and intertwine them with every different far from your face.
- Secure the cease of your twisted braid with a hair elastic.
- Loosen the twisted braid to make it appear fuller and end off the appearance.
10. Halo Braids
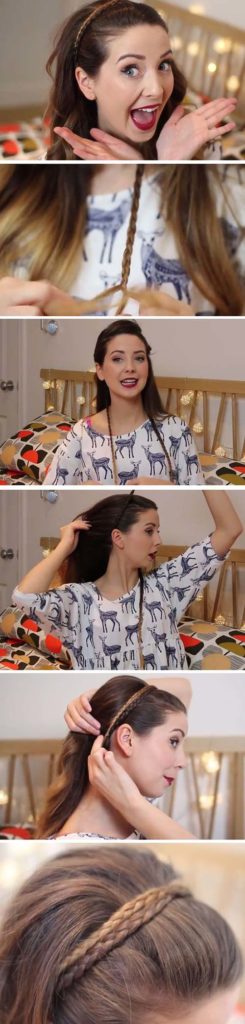
I don’t realize approximately you. However, I trust that Zoella is the present that continues on giving. From make-up to fashion to hairstyling to hair decor, is there anything this gorgeous YouTuber isn’t always desirable at? Here she demonstrates the most lovely halo braids fashion that even a 7 yr vintage can do on herself.
What You Need
- Hairbrush
- Smoothening serum
- Hair elastics
- Bobby pins
How To Style
- Brush again all of your hair.
- Pick up a 2-inch phase of hair from behind your left ear, braid it right till the cease, and secure it with a hair elastic.
- Repeat the previous step on the proper facet.
- Rub a few smoothening sera at the braids to dispose of any frizz.
- Place your left twist along the top of your head and pin it down behind your right ear and vice versa with your proper braid.
11. French Braid Twisted Bun
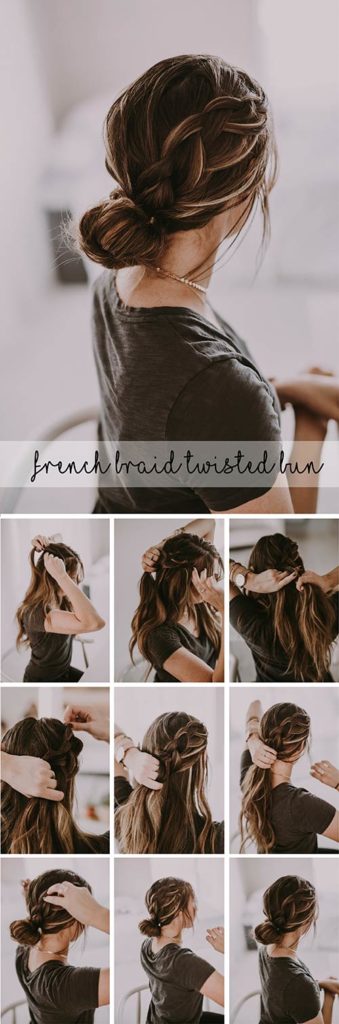
Where are you heading out for Sunday brunch along with your friends? Match the relaxed vibe of the afternoon with this adorable hair appearance. The French braided twisted bun appears effortlessly elegant. It is perfect for teaming up with a casual T-shirt and a dainty necklace.
What You Need
- Texturizing spray
- Hairbrush
- Hair elastic
- Bobby pins
How To Style
- Spritz on some texturizing spray and brush all of your hair again.
- From near your left temple (or proper, in case you so prefer), select up a medium-sized section of hair and break it up into three parts.
- French braid these three sections through including more hair into the braid from outside with each sew of the twist.
- Once your French braid has reached the again of your head, acquire all of your hair in one hand.
- Roll and tie all your hair right into a bun and secure it down to your head with the help of some bobby pins.
- Loosen your French braid and pull out a few strands to border your face and finish off the look.
12. Triple Twist Half Up
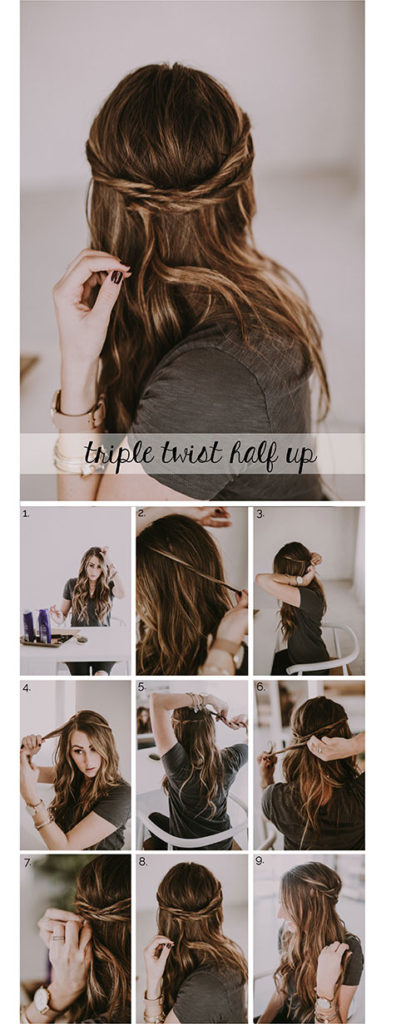
When going for half of up style, we typically work with just one section of hair on either aspect of our head and contact it a day. Shake things up a bit and strive out the appearance of this triple twist that works with multiple sections of hair to create an absolute darling hair look.
What You Need
- Heat protectant
- 2-inch curling iron
- Hairbrush
- Texturizing spray
- Bobby pins
How To Style
- Apply warmness protectant and loosely curl all of your hair.
- Spritz on a few texturizing spray and run a brush through your curls.
- Part your hair down the middle.
- Pick a small phase of hair from close to your left temple and twist it right until the quit.
- Pin this twisted segment of hair approximately 3/4th of the manner throughout the returned of your head (on the opposite aspect).
- Repeat steps four and five on the right facet.
- From below the first sections of hair on both, pick out up another phase of hair and repeat the entire twisting and pinning process. You will now have four alternating sections of braided hair.
- Gently loosen all of the twists to provide the style with some dimension and end off the look.
13. 10 Second Top Knot
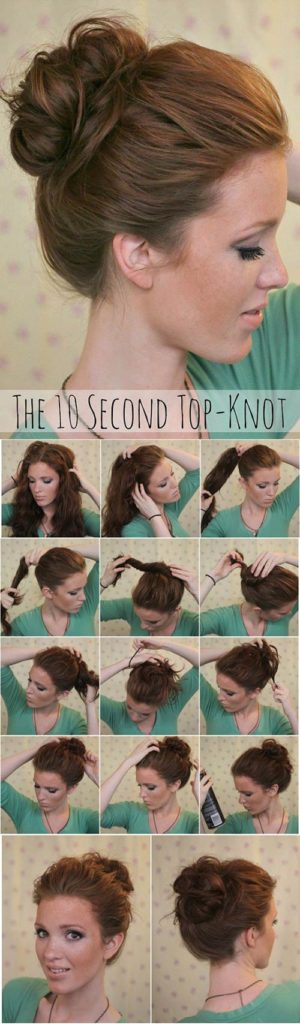
You ever questioned how those girls on Instagram control to tie the correct effortlessly lovely top knot? And why you look like a hairless troll while you try to do it? The mystery lies inside the technique, my friend. Simply observe the instructions beneath, and you’ll be looking as cute as them inside 10 seconds!
What You Need
- Texturizing spray
- Hair elastic
- Hairspray
How To Style
- Prep your hair with a few texturizing spray.
- Brush all your hair again together with your fingers.
- Gather all your hair in the back of your head and roll it into a bun.
- Secure the bun by way of tying it up with a hair elastic.
- Insert your fingers under the hair at the top of your head and gently pull it as much as creating some quantity.
- Spritz on some hairspray to prevent your bun from drooping down through the day.
14. One Minute Knotted Half Up
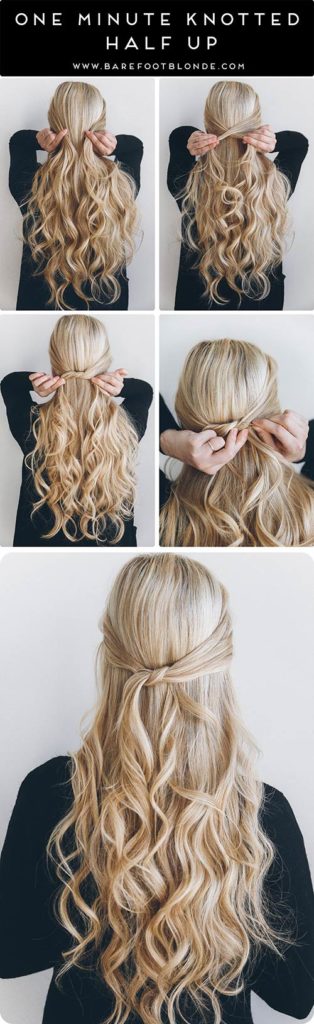
Hosting a fancy dinner party and have to run into the kitchen to get the quiches out of the oven? Don’t you dare pass everywhere close to the stove along with your hair throughout the location! Tie this secure knot and wow your visitors along with your awesome quite and elegant hairstyle (and your delicious quiches).
What You Need
- Heat protectant
- five-inch curling iron
- Bobby pins
How To Style
- Apply warmth protectant on your washed, dried hair.
- Picking up 1-inch sections of hair at a time, curl the lower 1/2 of all of your hair.
- Pick up 2-inch sections of hair from either aspect of your head and pull them returned.
- Tie those sections into a single knot at the back of your head.
- Secure the knotted hair in place with the help of a few bobby pins.
15. Triangular Parted Half Ponytail

Were you looking to nail Ariana Grande’s fashion statement? Then you’ve got one less, one much less problem, female! Her signature look is this outstanding high half of ponytail style that tows the road among flirty and sporty flawlessly. Try out with a simple t-blouse and jeans to serve some ~seems~.
What You Need
- Rattail comb
- Hair elastic
- Teasing brush
- Bobby pins
- Hairspray
How To Style
- Starting from the middle of your forehead, create two diagonal partitions that cross in opposite directions with the assist of a rat tail comb.
- Tie all the hair is among the walls right into a ponytail at the crown of your head.
- Tease down the bottom of the ponytail to create a few quantities in it.
- Pick a skinny phase of hair from the ponytail and wrap it across the base of the ponytail to cover the hair elastic from view.
- Secure the wrapped up section of hair with some bobby pins.
- Spritz on some hairspray to tame down any flyaways and finish off the look.
16. Twisted Halo

You are doing your hair for a wedding maybe this kind of task, especially if you’re one of the bridesmaids. If you’ve spent an excessive amount of time in getting the bride equipped and have approximately 5 minutes left earlier than the ceremony begins, this twisted halo hairstyle will have you searching exceptionally splendid in no time.
What You Need
- Heat protectant
- 5-inch curling iron
- Bobby pins
How To Style
- Start by using applying warmth protectant and curling all your hair.
- Part your hair down the middle.
- Pick up a 2-inch segment of hair from close to your proper temple and twist it properly till the give up.
- Pin this twisted phase of hair in the back of your head, slightly toward the left aspect.
- Pick up another period of hair from close to your left temple and twist it right till the cease.
- Flip this twisted section of hair beneath the first bent section and pin it in vicinity barely closer to the proper aspect of your head.
17. Simple Chignon
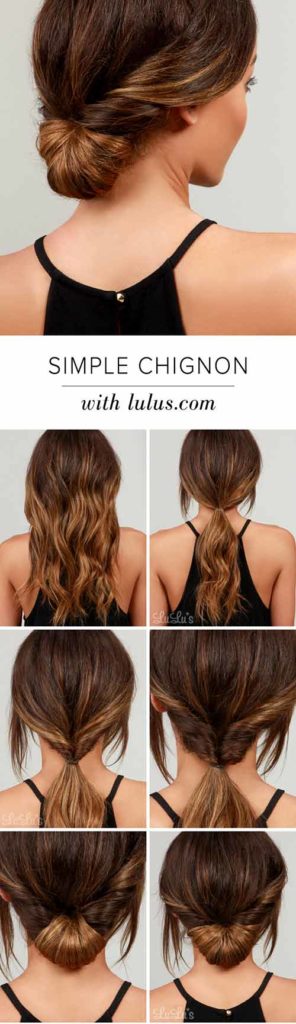
So your wild celebration woman days are over, and now you need to appear like the dignified female which you are. What hairstyle suits this function the best? It truly has were given to be a simple chignon. It’s got an understated fashionable vibe to have you ever looking just like the epitome of sophistication in no time.
What You Need
- Texturizing spray
- Hair elastic
- Bobby pins
How To Style
- Prep you are washed, dried hair with a few texturizing spray.
- Tie all your hair into a low ponytail.
- With your fingers, create a gap in the hair above the hair elastic, maintaining your ponytail.
- Topsy tail your ponytail via flipping it up and into this hole. Do this as soon as extra.
- Wrap your ponytail absolutely around the middle segment of the topsy tail.
- Spread out the hair of your ponytail and stable it in a region the use of bobby pins.
18. Side Twist Party-Perfect Style
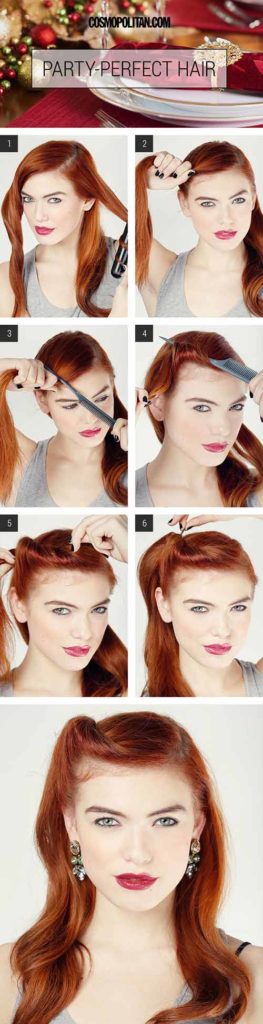
Have a Roaring 20’s theme party to wait and can’t figure out how to fashion your hair? This smooth yet glamorous facet rolled fashion can be flawlessly paired with a flapper dress to give you that luxurious heiress look. Another exceptional occasion you may game this appearance is at Christmas parties.
What You Need
- Heat protectant
- 2-inch curling iron
- Rattail comb
- Bobby pins
- U pins
- Hairspray
How To Style
- Apply warmth protectant throughout your washed, dried hair.
- Picking up large sections at a time, curl the lower 1/2 of all of your hair.
- Part your hair on one aspect.
- From the facet of the parting with extra hair, select up all the hair proper within the front.
- Place the tail of your comb horizontally on a pinnacle of this phase of hair.
- With your different hand, wrap this hair across the rear of the comb until you’ve reached the tail’s very end.
- Secure this rolled phase of hair in your head with bobby pins earlier than pulling out the brush.
- Insert a U pin into the curled hair to further stabilize it in location.
- Spritz on a few hairsprays to stable the style in the region.
19. Twisted Side Braid
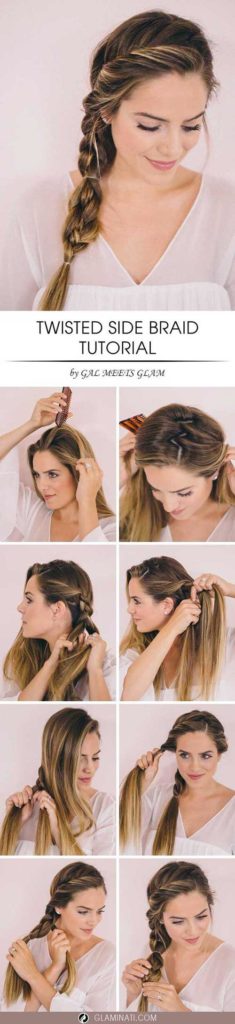
Are you always suffering from styling your hair for date nights? Can’t ever appear to locate any hairstyle that’s tender and romantic enough? Well, your search ends here, woman. This twisted facet braid is the best combination of a pretty French braid and a smooth twist that come collectively to create the correct romantic hairstyle.
What You Need
- Texturizing spray
- Hair elastics
How To Style
- Spritz on a few texturizing spray throughout your hair.
- While parting your hair on one aspect, move the brush in a zigzag sample against your head to create a diagonal parting.
- From the element with lesser hair, clutch a bit of hair from the front and divide it into three sections.
- French braid these three sections all alongside your hairline by using including more hair into the braid from the out of doors with each subsequent sew.
- Once your braid has reached the nape of your neck at the opposite side, honestly braid it for three or four greater stitches and steady it with a hair elastic.
- Now, take the first phase of hair neglected on the alternative aspect and start twisting it away from your face.
- Once you may’ t upload any higher hair to your twist, take it at the back of the French braid.
- Loop this twisted phase of hair in thru the middle of the braid.
- Remove the hair elastic out of your twist and tie it right under wherein you looped your braided hair into your braid.
- Now, redivide the hair below the hair elastic into three sections, truly braid it properly until the stop, and secure it with a hair elastic.
20. Twisted Top Knot
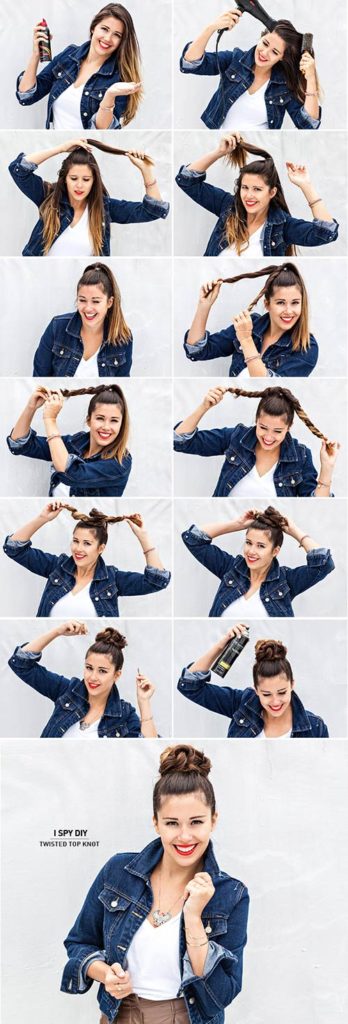
I undercover agent with my little eye… a completely badass searching pinnacle knot! Top knots are one of these rare hairstyles that can be dressed up or dressed down without it looking awkward and out of place. You can pair this twisted top knot with a ball gown or a denim jacket outfit without any hassles at all!
What You Need
- Volumizing mousse
- Blowdryer
- Round brush
- Hair elastic
- Bobby pins
- U pins
- Hairspray
How To Style
- Apply a dollop of volumizing mousse in your washed hair.
- Blowdry your hair even as brushing it down with a spherical brush.
- Pick up the pinnacle half of your hair and tie it into a ponytail at the crown of your head.
- Gather the closing hair at the bottom and tie it into a ponytail proper beneath the first ponytail.
- Split the first ponytail into sections.
- Individually, twist those sections of hair proper till the ends.
- Intertwine those twisted sections of hair with each other within the opposite path wherein they have been turned and steady with a hair elastic.
- Repeat steps five to 7 with the alternative ponytail.
- Wrap those twisted sections right into a bun around the base of the ponytails and stable it in your head with plenty of bobby pins and U pins.
- Spritz on a few hairsprays to prevent the bun from loosening or drooping via the day.
Here ends my list of various hairstyles for girls with lengthy hair. I’ve given you the ideas, and I’ve given you the instructions. So, what are you ready for?! Grab your comb and strive out those seems yourself to see how lovely they are. And don’t forget to comment below and let us understand which of them you would like to recreation.


